
A bread starter brings life to homemade bread with natural fermentation. It creates a soft crumb and a complex flavor profile. Moreover, it removes the need for commercial yeast.
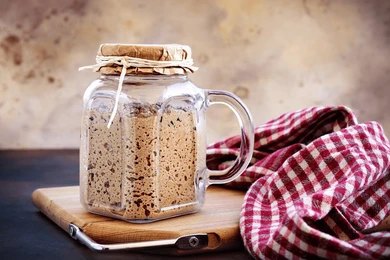
Bread Starter Guide:
Home bakers value starters for consistency and depth. However, beginners can also succeed with simple steps. Because the process repeats daily, it becomes easy to follow.Additionally, a starter uses only flour and water. While time builds strength, effort stays minimal. Therefore, anyone can maintain a healthy starter at home.
History of Bread Starter:
Bread starters trace back to ancient baking traditions. Early cultures used wild yeast from the air. Consequently, sourdough became the first leavened bread.Over centuries, bakers refined feeding methods. Meanwhile, families preserved starters for years. Today, this tradition continues in artisan baking worldwide.
Subscribe to our youtube channel Kitchenpedia for more delicious recipes and hit the like button if you enjoyed this youtubevideo. Share it with your friends and Family.
Bread Starter Guide
Ingredients
- 1 cup all-purpose flour
- 1 cup water (room temperature)
Instructions
- First, mix flour and water in a clean glass jar. Stir until smooth and lump-free. Then, cover loosely to allow airflow.
- Next, after 24 hours, discard half of the mixture. Add equal parts fresh flour and water. Stir thoroughly to combine.
- Continue feeding daily using the same method. Gradually, bubbles will appear and the starter will rise. Meanwhile, a mild sour aroma will develop.
- Finally, once the starter doubles in size within hours, it is ready for baking.
Notes
- Use non-chlorinated water for better fermentation.
- Keep the jar at a warm room temperature.
- Discard regularly to control volume.
- Avoid metal containers for storage.
- Stir well during each feeding.
- Expect slight variation in rise time.
- A tangy smell indicates healthy fermentation.
- Texture should stay thick and smooth.
Tips for Bread Starter Guide:
- Feed at consistent times daily.
- Use whole wheat flour to boost activity early.
- Mark jar level to track growth.
- Keep tools clean to prevent contamination.
- Move to a warmer spot if inactive.
- Refrigerate once stable and active.
- Feed weekly when stored cold.
- Use discard in other recipes.
FAQs for Bread Starter Guide:
Q:How long does it take to activate a starter?
It usually takes five to seven days.
Q:Why do I discard part of the starter?
Discarding keeps the culture balanced and manageable.
Q:Can I use whole wheat flour only?
Yes, it often speeds up fermentation.
Q:What smell is normal?
A mild sour smell is normal and healthy.
Q:Can I bake immediately after feeding?
Wait until the starter becomes bubbly and active.
Q:Why is my starter not rising?
It may need more warmth or regular feeding.
Q:Can I store it long term?
Yes, refrigeration slows activity for storage.
Q:Is this beginner-friendly?
Yes, the process remains simple and repeatable.
Conclusion:
A bread starter transforms simple ingredients into artisan-quality bread. It enhances flavor, texture, and freshness naturally. Moreover, it builds a rewarding baking routine. With patience and care, it becomes a dependable kitchen staple. Therefore, every home baker should try making one.