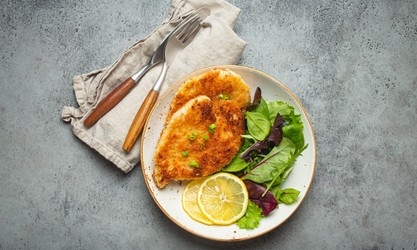
Crispy Panko Chicken Breasts:
Elevate your chicken game with our irresistible crispy panko chicken breast. These mouthwatering crispy panko chicken breast are coated in golden-brown panko breadcrumbs, resulting in a satisfying crunch with every bite. In this crispy panko chicken breast, we’ll guide you through the steps to achieve perfectly crispy chicken and provide answers to common questions to ensure your cooking success.
Subscribe to our youtube channel Kitchenpedia for more delicious recipes and hit the like button if you enjoyed this video. Share it with your friends and Family.

Crispy Panko Chicken Breasts
Ingredients
- 2 boneless, skinless chicken breasts
- Salt and pepper to taste
- 1 cup all-purpose flour
- 2 large eggs
- 1 ½ cups panko breadcrumbs
- ½ teaspoon paprika
- ½ teaspoon garlic powder
- ¼ teaspoon cayenne pepper (optional, for some heat)
- Cooking oil (such as vegetable or canola oil)
Instructions
- Preheat the Oven:Preheat your oven to 400°F (200°C). This will be used to keep the chicken warm after frying and ensure it stays crispy.
- Prepare the Chicken:Start by seasoning the chicken breasts with salt and pepper on both sides.Place the flour in a shallow dish or plate.
- In another dish, whisk the eggs until well beaten. In a third dish, mix the panko breadcrumbs, paprika, garlic powder, and cayenne pepper (if using).
- Coat the Chicken:Dredge each chicken breast in the flour, shaking off any excess.
- Dip the floured chicken into the beaten eggs, allowing any excess egg to drip off.
- Finally, coat the chicken with the panko breadcrumb mixture, pressing the breadcrumbs gently onto the chicken to adhere.
- Fry the Chicken:In a large skillet, heat about ¼ inch (0.6 cm) of cooking oil over medium-high heat.
- Carefully place the coated chicken breasts into the hot oil. Cook for about 3-4 minutes on each side, or until the chicken is golden brown and crispy, and the internal temperature reaches 165°F (75°C).
- Once cooked, remove the chicken from the skillet and place them on a wire rack briefly to let any excess oil drain.
- Keep Warm in the Oven:Transfer the crispy chicken breasts to the preheated oven to keep them warm while you finish cooking the remaining chicken.
- Serve:Once all the chicken breasts are cooked and kept warm in the oven, you're ready to serve.
- Serve the crispy panko chicken breasts with your favorite dipping sauces, side dishes, or on a bed of salad.
Notes
Tips For Perfect crispy panko chicken breasts:
- Pounding the Chicken: Before coating and frying, consider pounding the chicken breasts to an even thickness. This helps the chicken cook more evenly and ensures a consistent crispiness.
- Seasoning: Don’t skimp on seasoning the chicken with salt and pepper. Proper seasoning enhances the flavor of the chicken and the overall dish.
- Egg Wash: When dipping the chicken into the egg wash, make sure to let any excess egg drip off. This helps the breadcrumbs adhere evenly and prevents clumping.
- Breadcrumb Mixture: Customize the breadcrumb mixture by adding herbs, grated Parmesan cheese, or other seasonings for extra flavor and texture.
- Pressing Breadcrumbs: Gently press the breadcrumbs onto the chicken to help them adhere well. This step ensures a crispy and even coating.
- Oil Temperature: Maintain the oil temperature around 350-375°F (175-190°C) while frying. Using an oil thermometer can help you keep track of the temperature and achieve the perfect crispy texture.
- Oil Amount: Use enough oil in the skillet to come up about a quarter inch (0.6 cm) on the sides of the chicken. This allows for even frying without fully submerging the chicken.
- Draining Excess Oil: After frying, place the cooked chicken on a wire rack or paper towels to drain any excess oil. This prevents the coating from becoming soggy.
- Oven Keeping: Keep the oven preheated to a low temperature (around 200°F or 95°C) to maintain the crispiness of the chicken while you finish cooking the remaining pieces.
- Serve Immediately: Serve the Crispy Panko Chicken Breasts immediately after cooking to enjoy them at their best. Delaying can cause the coating to lose some of its crispiness.
- Dipping Sauces: Offer a variety of dipping sauces like honey mustard, ranch, BBQ sauce, or sriracha mayo for added flavor options.
- Experiment: Feel free to experiment with different coatings and seasonings to create your own unique twist on the recipe.
- Safety First: When working with hot oil, be cautious to avoid splatters and burns. Use long tongs for flipping the chicken and handle the oil carefully.
FAQS:
- Can I use chicken tenders instead of chicken breasts?
Certainly! Chicken tenders work well for this recipe and cook quickly for a delicious snack.
- Can I bake these chicken breasts instead of frying?
Absolutely! To achieve a healthier option, you can bake the breaded chicken breasts in a preheated oven at 400°F (200°C) for about 20-25 minutes, turning them halfway through.
- What dipping sauces go well with this dish?
Popular options include honey mustard, ranch dressing, or a tangy barbecue sauce.
With their satisfying crunch and flavorful coating, these crispy panko chicken breasts are a surefire way to elevate your chicken dinner. Whether you’re serving them as a main dish or slicing them for sandwiches, their irresistible texture and taste are bound to make a lasting impression. With simple ingredients and easy-to-follow steps, this recipe is a go-to choice for a delightful and satisfying meal.
